Friday, August 12, 2016

Building a Note-Taking Software-as-a-Service Using ASP.NET MVC 5, Stripe, and Azure_part 1

What You'll Be Creating
1. Introduction

In this tutorial, I'm going to show you how to build a Software-as-a-Service (SaaS) minimum viable product (MVP). To keep things simple, the software is going to allow our customers to save a list of notes.

I am going to offer three subscription plans: the Basic plan will have a limit of 100 notes per user, the Professional plan will allow customers to save up to 10,000 notes, and the Business plan will allow a million notes. The plans are going to cost $10, $20 and $30 per month respectively. In order to receive payment from our customers, I'm going to use Stripe as a payment gateway, and the website is going to be deployed to Azure.

2. Setup 

2.1 Stripe
In a very short time Stripe has become a very well known Payment Gateway, mainly because of their developer-friendly approach, with simple and well-documented APIs. Their pricing is also very clear: 2.9% per transaction + 30 cents. No setup fees or hidden charges.

Credit card data is also very sensitive data, and in order to be allowed to receive and store that data in my server, I need to be PCI compliant. Because that's not an easy or quick task for most small companies, the approach that many payment gateways take is: You display the order details, and when the customer agrees to purchase, you redirect the customer to a page hosted by the payment gateway (bank, PayPal, etc), and then they redirect the customer back.

Stripe has a nicer approach to this problem. They offer a JavaScript API, so we can send the credit card number directly from the front-end to Stripe's servers. They return a one-time use token that we can save to our database. Now, we only need an SSL certificate for our website that we can quickly purchase from about $5 per year.

Now, sign up for a Stripe account, as you'll need it to charge your customers.

2.2 Azure
As a developer I don't want to be dealing with dev-ops tasks and managing servers if I don't have to. Azure websites is my choice for hosting, because it's a fully managed Platform-as-a-Service. It allows me to deploy from Visual Studio or Git, I can scale it easily if my service is successful, and I can focus on improving my application. They offer $200 to spend on all Azure services in the first month to new customers. That's enough to pay for the services that I am using for this MVP. Sign up for Azure.

2.3 Mandrill and Mailchimp: Transactional Email
Sending emails from our application might not seem like a very complex task, but I would like to monitor how many emails are delivered successfully, and also design responsive templates easily. This is what Mandrill offers, and they also let us send up to 12,000 emails per month for free. Mandrill is built by MailChimp, so they know about the business of sending emails. Also, we can create our templates from MailChimp, export them to Mandrill, and send emails from our app using our templates. Sign up for Mandrill, and sign up for MailChimp.

2.4 Visual Studio 2013 Community Edition
Last but not least, we need Visual Studio to write our application. This edition, which was launched only a few months ago, is completely free and is pretty much equivalent to Visual Studio Professional. You can download it here, and this is all we need, so now we can focus on the development.

3. Creating the Website

The first thing that we need to do is open Visual Studio 2013. Create a new ASP.NET Web Application:
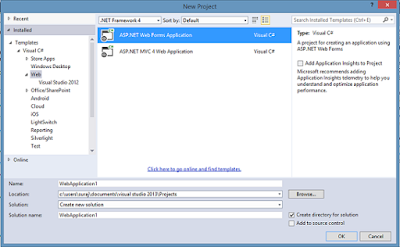
  • Go to File > New Project and choose ASP.NET Web Application.
  • On the ASP.NET template dialog, choose the MVC template and select Individual User Accounts.

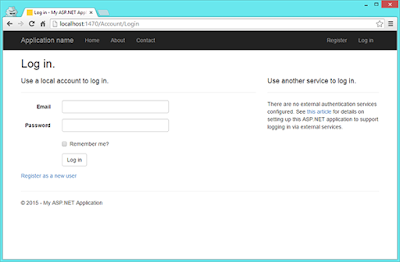
This project creates an application where a user can login by registering an account with the website. The website is styled using Bootstrap, and I'll continue building the rest of the app with Bootstrap. If you hit F5 in Visual Studio to run the application, this is what you will see:
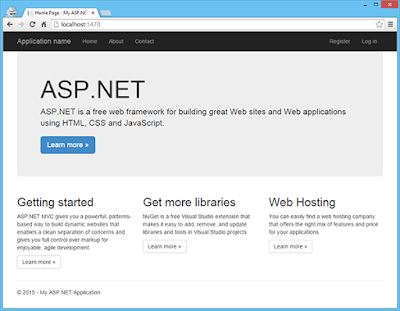

This is the default landing page, and this page is one of the most important steps to convert our visitors into customers. We need to explain the product, show the price for each plan, and offer them the chance to sign up for a free trial. For this application I am creating three different subscription plans:
  • Basic: $10 per month
  • Professional: $20 per month
  • Business: $30 per month
3.1 Landing Page
For some help creating a landing page, you can visit ThemeForest and purchase a template. For this sample, I am using a free template, and you can see the final result in the photo below.


3.2 Registration Page
In the website that we created in the previous step, we also get a Registration form template. From the landing page, when you navigate to Prices, and click on Free Trial, you navigate to the registration page. This is the default design:
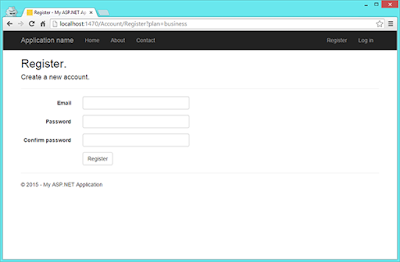

We only need one extra field here to identify the subscription plan that the user is joining. If you can see in the navigation bar of the photo, I am passing that as a GET parameter. In order to do that, I generate the markup for the links in the landing page using this line of code:
  1. <a href="@Url.Action("Register", "Account", new { plan = "business" })">
  2.     Free Trial
  3. </a>
To bind the Subscription Plan to the back-end, I need to modify the class RegisterViewModel and add the new property.
  1. public class RegisterViewModel
  2. {
  3.     [Required]
  4.     [EmailAddress]
  5.     [Display(Name = "Email")]
  6.     public string Email { get; set; }
  7.  
  8.     [Required]
  9.     [StringLength(100, ErrorMessage = "The {0} must be at least {2} characters long.", MinimumLength = 6)]
  10.     [DataType(DataType.Password)]
  11.     [Display(Name = "Password")]
  12.     public string Password { get; set; }
  13.  
  14.     [DataType(DataType.Password)]
  15.     [Display(Name = "Confirm password")]
  16.     [Compare("Password", ErrorMessage = "The password and confirmation password do not match.")]
  17.     public string ConfirmPassword { get; set; }
  18.  
  19.     public string SubscriptionPlan { get; set; }
  20. }
I also have to edit AccountController.cs, and modify the Action Register to receive the plan:
  1. [AllowAnonymous]
  2. public ActionResult Register(string plan)
  3. {
  4.     return View(new RegisterViewModel
  5.     {
  6.         SubscriptionPlan = plan
  7.     });
  8. }
Now, I have to render the Plan Identifier in a hidden field in the Register form:
  1. @Html.HiddenFor(m => m.SubscriptionPlan)
The last step will be to subscribe the user to the plan, but we'll get to that a bit later. I also update the design of the registration form.


3.3 Login Page

 In the template we also get a login page and action controllers implemented. The only thing I need to do is to make it look prettier.


3.4 Forgot Password
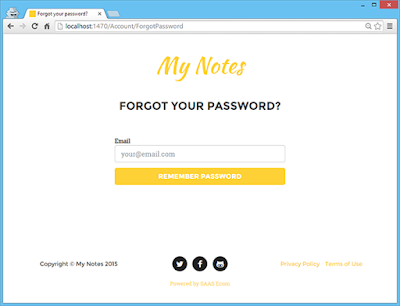
Take a second look at the previous screenshot, and you'll notice that I added a "Forgot your Password?" link. This is already implemented in the template, but it's commented out by default. I don't like the default behaviour, where the user needs to have the email address confirmed to be able to reset the password. Let's remove that restriction. In the file AccountController.cs edit the action ForgotPassword:
  1. [HttpPost]
  2. [AllowAnonymous]
  3. [ValidateAntiForgeryToken]
  4. public async Task<ActionResult> ForgotPassword(ForgotPasswordViewModel model)
  5. {
  6.     if (ModelState.IsValid)
  7.     {
  8.         var user = await UserManager.FindByNameAsync(model.Email);
  9.         if (user == null)
  10.         {
  11.             // Don't reveal that the user does not exist or is not confirmed
  12.             return View("ForgotPasswordConfirmation");
  13.         }
  14.  
  15.         // For more information on how to enable account confirmation and password reset please visit http://go.microsoft.com/fwlink/?LinkID=320771
  16.         // Send an email with this link
  17.         // string code = await UserManager.GeneratePasswordResetTokenAsync(user.Id);
  18.         // var callbackUrl = Url.Action("ResetPassword", "Account", new { userId = user.Id, code = code }, protocol: Request.Url.Scheme);       
  19.         // await UserManager.SendEmailAsync(user.Id, "Reset Password", "Please reset your password by clicking <a href=\"" + callbackUrl + "\">here</a>");
  20.         // return RedirectToAction("ForgotPasswordConfirmation", "Account");
  21.     }
  22.  
  23.     // If we got this far, something failed, redisplay form
  24.     return View(model);
  25. }
The code to send the email with the link to reset the password is commented out. I'll show how to implement that part a bit later. The only thing left for now is to update the design of the pages:
  • ForgotPassword.cshtml: Form that is displayed to the user to enter his or her email.
  • ForgotPasswordConfirmation.cshtml: Confirmation message after the reset link has been emailed to the user.
  • ResetPassword.cshtml: Form to reset the password after navigating to the reset link from the email.
  • ResetPasswordConfirmation.cshtml: Confirmation message after the password has been reset.
4. ASP.NET Identity 2.0

ASP.NET Identity is a fairly new library that has been built based on the assumption that users will no longer log in by using only a username and password. OAuth integration to allow users to log in through social channels such as Facebook, Twitter, and others is very easy now. Also, this library can be used with Web API, and SignalR. 

On the other hand, the persistence layer can be replaced, and it's easy to plug in different storage mechanisms such as NoSQL databases. For the purposes of this application, I will use Entity Framework and SQL Server.

The project that we just created contains the following three NuGet packages for ASP.NET Identity:
  • Microsoft.AspNet.Identity.Core: This package contains the core interfaces for ASP.NET Identity.
  • Microsoft.AspNet.Identity.EntityFramework: This package has the Entity Framework implementation of the previous library. It will persist the data to SQL Server.
  • Microsoft.AspNet.Identity.Owin: This package plugs the middle-ware OWIN authentication with ASP.NET Identity.
The main configuration for Identity is in App_Start/IdentityConfig.cs. This is the code that initializes Identity.
  1. public static ApplicationUserManager Create(IdentityFactoryOptions<ApplicationUserManager> options, IOwinContext context) 
  2. {
  3.     var manager = new ApplicationUserManager(new UserStore<ApplicationUser>(context.Get<ApplicationDbContext>()));
  4.     // Configure validation logic for usernames
  5.     manager.UserValidator = new UserValidator<ApplicationUser>(manager)
  6.     {
  7.         AllowOnlyAlphanumericUserNames = false,
  8.         RequireUniqueEmail = true
  9.     }; 
  10.     // Configure validation logic for passwords
  11.     manager.PasswordValidator = new PasswordValidator
  12.     {
  13.         RequiredLength = 6,
  14.         RequireNonLetterOrDigit = true,
  15.         RequireDigit = true,
  16.         RequireLowercase = true,
  17.         RequireUppercase = true,
  18.     };
  19.     // Configure user lockout defaults
  20.     manager.UserLockoutEnabledByDefault = true;
  21.     manager.DefaultAccountLockoutTimeSpan = TimeSpan.FromMinutes(5);
  22.     manager.MaxFailedAccessAttemptsBeforeLockout = 5; 
  23.     // Register two factor authentication providers. This application uses Phone and Emails as a step of receiving a code for verifying the user
  24.     // You can write your own provider and plug it in here.
  25.     manager.RegisterTwoFactorProvider("Phone Code", new PhoneNumberTokenProvider<ApplicationUser>
  26.     {
  27.         MessageFormat = "Your security code is {0}"
  28.     });
  29.     manager.RegisterTwoFactorProvider("Email Code", new EmailTokenProvider<ApplicationUser>
  30.     {
  31.         Subject = "Security Code",
  32.         BodyFormat = "Your security code is {0}"
  33.     });
  34.     manager.EmailService = new EmailService();
  35.     manager.SmsService = new SmsService();
  36.     var dataProtectionProvider = options.DataProtectionProvider;
  37.     if (dataProtectionProvider != null)
  38.     {
  39.         manager.UserTokenProvider = 
  40.             new DataProtectorTokenProvider<ApplicationUser>(dataProtectionProvider.Create("ASP.NET Identity"));
  41.     }
  42.     return manager;
  43. }
As you can see in the code, it's pretty easy to configure users' validators and password validators, and two factor authentication can also be enabled. For this application, I use cookie-based authentication. The cookie is generated by the framework and is encrypted. This way, we can scale horizontally, adding more servers if our application needs it.
Written by Pedro Alonso

If you found this post interesting, follow and support us.
Suggest for you:

Thursday, August 11, 2016

Developing an ASP.NET Web API_part 2 (end)

Web API Service Structure for Mobile Devices

Now that the basic idea of how Actions from Controllers can be exposed through the API is understood, let's look at how an API Service can be designed for clients.


The ASP.NET Web API request pipeline receives requests from the client application, and an action method in a controller will be invoked. The action method will, in turn, invoke the Business layer for fetching or updating data, which, in turn, invokes the Repository class to return data from the database.

Based on this design pattern, let's create a sample API that exposes a list of Classified items as a service to its clients.

Create a class called ClassifiedModel inside the Models folder.
  1. public class ClassifiedModel
  2.     {
  3.         public int ClassifiedID { get; set; }
  4.         public string ClassifiedTitle { get; set; }
  5.         public string ClassifiedDetail { get; set; }
  6.         public DateTime CreatedDate { get; set; }
  7.         public string ClassifiedImage { get; set; }
  8.     }
Create two folders BLL and DAL representing the Business Logic Layer and Data Access Layer.

Create a class called ClassifiedRepository inside the DAL folder where we will hard-code some data for the classified list and expose the list through a static method.
  1. public class ClassifiedRepository
  2.     {
  3.         //list of Classified Objects
  4.         public static List<ClassifiedModel> classifiedList;
  5.  
  6.         /// <summary>
  7.         /// get list of classified models
  8.         /// </summary>
  9.         /// <returns></returns>
  10.         public static List<ClassifiedModel> GetClassifiedsList()
  11.         {
  12.             if (classifiedList == null
  13.             || classifiedList.Count == 0)
  14.             {
  15.                 CreateClassifiedsList();
  16.             }
  17.             return classifiedList;
  18.         }
  19.  
  20.         /// <summary>
  21.         /// Init a list of classified items
  22.         /// </summary>
  23.         private static void CreateClassifiedsList()
  24.         {
  25.             classifiedList = new List<ClassifiedModel>()
  26.             {
  27.                 new ClassifiedModel()
  28.                 {
  29.                     ClassifiedID = 1,
  30.                     ClassifiedTitle = "Car on Sale",
  31.                     ClassifiedDetail = "Car details car details car details",
  32.                     CreatedDate = DateTime.Now,
  33.                     ClassifiedImage = "/carImageUrl.jpg"
  34.                 },
  35.  
  36.                 new ClassifiedModel()
  37.                 {
  38.                     ClassifiedID = 2,
  39.                     ClassifiedTitle = "House on Sale",
  40.                     ClassifiedDetail = "House details house details house details",
  41.                     CreatedDate = DateTime.Now,
  42.                     ClassifiedImage = "/houseImageUrl.jpg"
  43.                 },
  44.  
  45.                 new ClassifiedModel()
  46.                 {
  47.                     ClassifiedID = 3,
  48.                     ClassifiedTitle = "Room for rent",
  49.                     ClassifiedDetail = "Room details room details room details",
  50.                     CreatedDate = DateTime.Now,
  51.                     ClassifiedImage = "/roomImageUrl.jpg"
  52.                 },
  53.  
  54.                 new ClassifiedModel()
  55.                 {
  56.                     ClassifiedID = 4,
  57.                     ClassifiedTitle = "Tree on Sale",
  58.                     ClassifiedDetail = "Tree details tree details tree details",
  59.                     CreatedDate = DateTime.Now,
  60.                     ClassifiedImage = "/treeImageUrl.jpg"
  61.                 }
  62.  
  63.             };
  64.         }
  65.     }
Let's add another class ClassifiedService inside the BLL folder now. This class will contain a static method to access the repository and return business objects to the controller. Based on the search parameters, the method will return the list of classified items.
  1. public class ClassifiedService
  2.     {
  3.         public static List<ClassifiedModel> GetClassifieds(string searchQuery)
  4.         {
  5.             var classifiedList = ClassifiedRepository.GetClassifiedsList();
  6.  
  7.             if (!string.IsNullOrEmpty(searchQuery))
  8.             {
  9.                 return (from m in classifiedList
  10.                         where m.ClassifiedTitle.StartsWith(searchQuery, StringComparison.CurrentCultureIgnoreCase)
  11.                         select m).ToList();
  12.             }
  13.             return classifiedList;
  14.         }       
  15.     }
Finally, now we will create our Web API controller for the classified listing related methods.

Similar to how we created our first TestController, let's create an API controller with empty read/write actions called ClassifiedsController and add the following two Action methods.
  1. public class ClassifiedsController : ApiController
  2.     {
  3.         public List<ClassifiedModel> Get(string id)
  4.         {
  5.             return ClassifiedService.GetClassifieds(id);
  6.         }
  7.         public List<ClassifiedModel> Get()
  8.         {
  9.             return ClassifiedService.GetClassifieds("");
  10.         }
  11.     }
Now, we have two Actions exposed through the API. The first GET method will be invoked if there is a keyword to be searched that is passed along with the request. If there is no input parameter, then the second GET method will be invoked. Both methods will return a list of our Classified model objects.

Do not forget to add all the required references to the namespaces in each of the added class files. Build the project, and we are ready to test both of these methods now.

To display results containing the search parameter "house", hit the following URL in the browser: http://localhost/TestAPI/api/classifieds/get/house.

We should get the following response in the browser:


To see the entire list of classifieds, hit the URL without passing any parameters: http://localhost/TestAPI/api/classifieds/get/.

You should see the following result:


We can add any number of Actions and Controllers in the same manner as desired by the clients.

Content Negotiation

Up to now, we've seen examples of API that send XML responses to the clients. Now let's look at other content types like JSON and Image response, which fall under the topic of Content Negotiation.

The HTTP specification (RFC 2616) defines content negotiation as “the process of selecting the best representation for a given response when there are multiple representations available." Thanks to Web API's Content Negotiation feature, clients can tell Web API services what content format it accepts, and Web API can serve the client with the same format automatically, provided that the format is configured in Web API.

Requesting JSON Format
The HTTP Accept header is used to specify the media types that are acceptable to the
client for the responses. For XML, the value is set as "application/xml" and for JSON "application/json".

In order to test our API with the HTTP Accept headers, we can use the extensions available for the browsers that allow us to create custom HTTP requests.

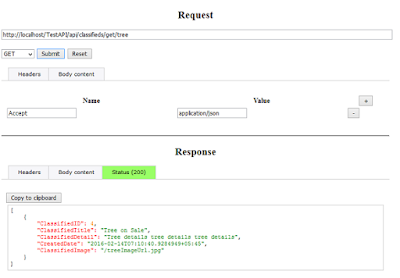
Here, I am using an extension called HTTP Tool available for Mozilla Firefox to create the Accept header that specifies JSON as the response type.


As you can see from the image, the response that is being received is in JSON format.

Image File as Response
Finally, let's see how we can send an Image file as a response through Web API.

Let's create a folder called Images and add an image called "default.jpg" inside it, and then add the following Action method inside our ClassifiedsController.
  1. public HttpResponseMessage GetImage()
  2.         {
  3.             byte[] bytes = System.IO.File
  4.                            .ReadAllBytes
  5.                            (
  6.                                 HttpContext.Current.Server
  7.                                 .MapPath("~/Images/default.jpg")
  8.                            );
  9.              
  10.             var result = new HttpResponseMessage(HttpStatusCode.OK);
  11.  
  12.             result.Content = new ByteArrayContent(bytes);
  13.  
  14.             result.Content.Headers.ContentType = new MediaTypeHeaderValue("image/png");
  15.             return result;
  16.         }
Also, these two namespaces should be included: System.Web, System.Web.Http.

Here we are creating an HTTP response using the HttpResponseMessage class and setting the image bytes as the response content. Also, we are setting the Content-Type header to "image/png".

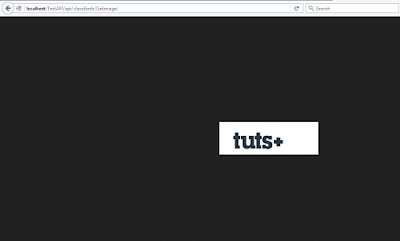
Now, if we call this action in our browser, Web API will send our default.jpg image as a response: http://localhost/TestAPI/api/classifieds/Getimage/.

Conclusion

In this tutorial, we looked at how ASP.NET Web API can easily be created and exposed to clients as Action methods of MVC Controllers. We looked at the default and custom routing system, created the basic structure of a real-time business application API Service, and also looked at different response types.
Written by Sovit Poudel

If you found this post interesting, follow and support us.
Suggest for you:

REST WCF Service in ASP.NET

Visual Basic.Net Tutorials for Beginners

Monday, August 8, 2016

Developing an ASP.NET Web API_part1

ASP.NET Web API is a framework for building web APIs on top of the .NET Framework which makes use of HTTP. As almost any platform that you can think of has an HTTP library, HTTP services can be consumed by a broad range of clients, including browsers, mobile devices, and traditional desktop applications.

ASP.NET Web API  leverages the concepts of HTTP and provides features such as:
  • Different Request/Response type supported like HTML, JSON and Binary Files (image/audio/video) and not just XML content as required by SOAP.
  • Built-in Action Mapping in controller, based on HTTP verbs (GET, POST, etc.)
Creating a Web API

To create a Web API, we will use Visual Studio. If you have Visual Studio 2012 or a higher version of it, then you are all good to start off with your Web API.

Starting a New Project
From the File menu, select New and then Project.

In the Templates pane, select Installed Templates and expand the Visual C# node. Under Visual C#, select Web. In the list of project templates, select ASP.NET Web Application. Set your preferred name for the project and click OK.


In the next window, you will be presented with a list of templates. While you can select any one of the templates from the list as they all will contain DLL files and configurations required to create Web API controllers, we will select the Empty Project Template to start with.


Adding a Controller
In Web API, a controller is an object that handles HTTP requests. Let's quickly add a controller for testing our Web API.

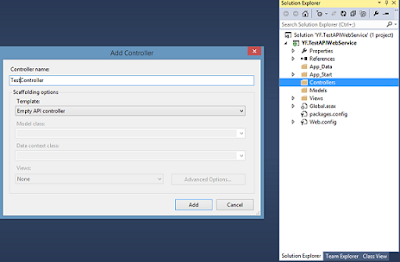
In Solution Explorer, right-click the Controllers folder. Select Add and then select Controller. We will call the controller TestController and select Empty API Controller from the Scaffolding options for Template.

Visual Studio will create our controller deriving from the ApiController class. Let's add a quick function here to test our API project by hosting it in IIS.
  1. public IEnumerable<string> Get()
  2.         {
  3.             return new string[] { "hello", "world" };
  4.         }
Hosting in IIS
Now we will add our service in IIS so that we can access it locally. Open IIS and right-click on Default Web Site to add our web service.

In the Add Application dialog box, name your service TestAPI and provide a path to the Visual Studio project's root path as shown below.


Click OK and our Web API Service is ready.

To test whether everything works fine, let's try the following URL in any browser: http://localhost/TestAPI/api/test.

If you have named your controller TestController as I have and also named your web service in IIS as TestAPI then your browser should return an XML file as shown below with string values hello world.


However, if your IIS doesn't have permission for the project folder, you might get an error message saying: "The requested page cannot be accessed because the related configuration data for the page is invalid." 

If you get this type of error then you can resolve it by giving read/write access to the IIS_IUSRS user group to the root folder.

Routing

Now let's look at how the URL that we provided to the browser is working.

ASP.NET Routing handles the process of receiving a request and mapping it to a controller action. Web API routing is similar to MVC routing but with some differences; Web API uses the HTTP request type instead of the action name in the URL (as in the case of MVC) to select the action to be executed in the controller.

The routing configuration for Web API is defined in the file WebApiConfig.cs. The default routing configuration of ASP.NET Web API is as shown in the following:
  1. public static class WebApiConfig
  2.     {
  3.         public static void Register(HttpConfiguration config)
  4.         {
  5.             config.Routes.MapHttpRoute(
  6.                 name: "DefaultApi",
  7.                 routeTemplate: "api/{controller}/{id}",
  8.                 defaults: new { id = RouteParameter.Optional }
  9.             );
  10.         }
  11.     }
The default routing template of Web API is api/{controller}/{id}. That is why we had "api" in our URL http://localhost/TestAPI/api/test.

When Web API receives a GET request for a particular controller, the list of matching actions are all methods whose name starts with GET. The same is the case with all the other HTTP verbs. The correct action method to be invoked is identified by matching the signature of the method.

This naming convention for action methods can be overridden by using the HttpGet,
HttpPut, HttpPost, or HttpDelete attributes with the action methods.

So, if we replace our previous code with this:
  1. [HttpGet]
  2.         public IEnumerable<string> Hello()
  3.         {
  4.             return new string[] { "hello", "world" };
  5.         }
And hit http://localhost/TestAPI/api/test on our browser, this will still return the same result. If we remove the HttpGet attribute, our Web API will not be able to find a matching Action for our request.

Now, let's add another method with same name Hello but with a different signature.
  1. [HttpGet]
  2.         public IEnumerable<string> Hello(string id)
  3.         {
  4.             return new string[] { id, "world" };
  5.         }
Using this method, we can now control what is being returned from our Service to some extent. If we test this method by calling http://localhost/TestAPI/api/test/namaste (notice an extra parameter at the end of the URL), we will get the following output:


So, now we have two methods called Hello. One doesn't take any parameters and returns strings "hello world", and another method takes one parameter and returns "yourparameter world".

While we have not provided the name of our method to be executed in our URL, the default ASP.NET routing understands the request as a GET request and based on the signature of the request (parameters provided), the particular method is executed. This is fine if we have only one GET or POST method in our controller, but since in any real business application there would usually be more than one such GET method, this default routing is not sufficient.

Let's add another GET method to see how the default routing handles it.
  1. [HttpGet]
  2.         public IEnumerable<string> GoodBye()
  3.         {
  4.             return new string[] { "good bye", "world" };
  5.         }
If we now build our project and call http://localhost/TestAPI/api/test/ in our browser, we will get an error that says "Multiple actions were found that match the request", which means the routing system is identifying two actions matching the GET request.


Customizing the Default Routing System of Web API
To be able to use multiple GET requests from the same controller, we need to change the HTTP request type identifier with an Action-based identifier so that multiple GET requests can be called.

This can be done by adding the following route configuration before the default configuration in WebApiConfig.cs.
  1. config.Routes.MapHttpRoute(
  2.                 name: "DefaultApi2",
  3.                 routeTemplate: "api/{controller}/{action}/{id}",
  4.                 defaults: new { id = RouteParameter.Optional }
  5.             );
Now test all three methods by calling these URLs:
  • http://localhost/TestAPI/api/test/hello
  • http://localhost/TestAPI/api/test/hello/my
  • http://localhost/TestAPI/api/test/goodbye
Written by Sovit Poudel
If you found this post interesting, follow and support us.
Suggest for you:

REST WCF Service in ASP.NET

Visual Basic.Net Tutorials for Beginners

Make VR Games in Unity with C# - Cardboard, Gear VR, Oculus