ASP.NET Web API leverages the concepts of HTTP and provides features such as:
- Different Request/Response type supported like HTML, JSON and Binary Files (image/audio/video) and not just XML content as required by SOAP.
- Built-in Action Mapping in controller, based on HTTP verbs (GET, POST, etc.)
To create a Web API, we will use Visual Studio. If you have Visual Studio 2012 or a higher version of it, then you are all good to start off with your Web API.
Starting a New Project
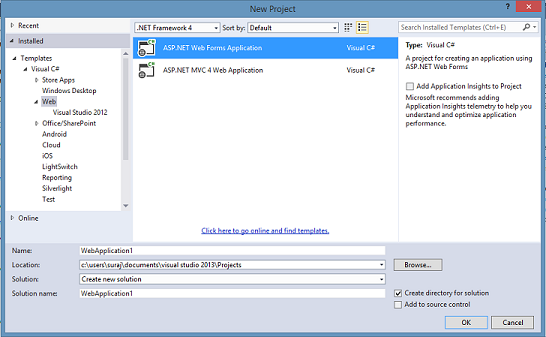
From the File menu, select New and then Project.
In the Templates pane, select Installed Templates and expand the Visual C# node. Under Visual C#, select Web. In the list of project templates, select ASP.NET Web Application. Set your preferred name for the project and click OK.
 |
 |
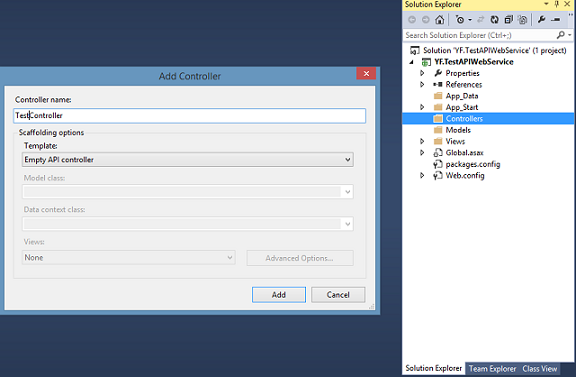
In Web API, a controller is an object that handles HTTP requests. Let's quickly add a controller for testing our Web API.
In Solution Explorer, right-click the Controllers folder. Select Add and then select Controller. We will call the controller TestController and select Empty API Controller from the Scaffolding options for Template.
 |
- public IEnumerable<string> Get()
- {
- return new string[] { "hello", "world" };
- }
Now we will add our service in IIS so that we can access it locally. Open IIS and right-click on Default Web Site to add our web service.
 |
 |
To test whether everything works fine, let's try the following URL in any browser: http://localhost/TestAPI/api/test.
If you have named your controller TestController as I have and also named your web service in IIS as TestAPI then your browser should return an XML file as shown below with string values hello world.
 |
However, if your IIS doesn't have permission for the project folder, you might get an error message saying: "The requested page cannot be accessed because the related configuration data for the page is invalid."
If you get this type of error then you can resolve it by giving read/write access to the IIS_IUSRS user group to the root folder.
Routing
Now let's look at how the URL that we provided to the browser is working.
ASP.NET Routing handles the process of receiving a request and mapping it to a controller action. Web API routing is similar to MVC routing but with some differences; Web API uses the HTTP request type instead of the action name in the URL (as in the case of MVC) to select the action to be executed in the controller.
The routing configuration for Web API is defined in the file WebApiConfig.cs. The default routing configuration of ASP.NET Web API is as shown in the following:
- public static class WebApiConfig
- {
- public static void Register(HttpConfiguration config)
- {
- config.Routes.MapHttpRoute(
- name: "DefaultApi",
- routeTemplate: "api/{controller}/{id}",
- defaults: new { id = RouteParameter.Optional }
- );
- }
- }
When Web API receives a GET request for a particular controller, the list of matching actions are all methods whose name starts with GET. The same is the case with all the other HTTP verbs. The correct action method to be invoked is identified by matching the signature of the method.
This naming convention for action methods can be overridden by using the HttpGet,
HttpPut, HttpPost, or HttpDelete attributes with the action methods.
So, if we replace our previous code with this:
- [HttpGet]
- public IEnumerable<string> Hello()
- {
- return new string[] { "hello", "world" };
- }
Now, let's add another method with same name Hello but with a different signature.
- [HttpGet]
- public IEnumerable<string> Hello(string id)
- {
- return new string[] { id, "world" };
- }
 |
While we have not provided the name of our method to be executed in our URL, the default ASP.NET routing understands the request as a GET request and based on the signature of the request (parameters provided), the particular method is executed. This is fine if we have only one GET or POST method in our controller, but since in any real business application there would usually be more than one such GET method, this default routing is not sufficient.
Let's add another GET method to see how the default routing handles it.
- [HttpGet]
- public IEnumerable<string> GoodBye()
- {
- return new string[] { "good bye", "world" };
- }
 |
To be able to use multiple GET requests from the same controller, we need to change the HTTP request type identifier with an Action-based identifier so that multiple GET requests can be called.
This can be done by adding the following route configuration before the default configuration in WebApiConfig.cs.
- config.Routes.MapHttpRoute(
- name: "DefaultApi2",
- routeTemplate: "api/{controller}/{action}/{id}",
- defaults: new { id = RouteParameter.Optional }
- );
- http://localhost/TestAPI/api/test/hello
- http://localhost/TestAPI/api/test/hello/my
- http://localhost/TestAPI/api/test/goodbye
If you found this post interesting, follow and support us.
Suggest for you:
REST WCF Service in ASP.NET
Visual Basic.Net Tutorials for Beginners
Make VR Games in Unity with C# - Cardboard, Gear VR, Oculus
No comments:
Post a Comment